![]() Adding text
Adding text
![]() Adding text
Adding text
|
<< Click to Display Table of Contents >> Navigation: Text >
|
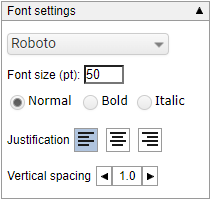
Select the text tool in the toolbar on the left of the screen. This will show a panel on the right where you can set the font size and style. The drop down list contains a selection of fonts.
There are two Chinese fonts in the list (shown in red) and two "joined up" fonts (shown in blue).
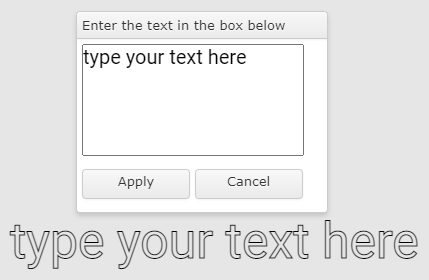
Click on the drawing area where you want the text to be placed. This will show a pop-up box at the top of the screen where you can type in the text.
You can set the justification to "left", "centre" or "right"
The vertical spacing adjust the vertical spacing between lines of text.
The font size in the box is fixed, but as you type the text will appear in the drawing area at the correct size.
Tip: If the input box is covering the text, you can move the box by dragging on the title bar.
The text in the box will wrap automatically but it will appear as a single line unless you insert a return.
Click the "Apply" button to close the input box and keep the text in the drawing area.
N.B. While the box is showing, you can't change the font settings.
Once the text is added to the drawing area and selected, you can change the fill colour and line colour like any other drawing object.
Chinese text

In the example on the left, Chinese text has been entered into the text input box. The font used in the input is a font on your PC or tablet. This will display correctly in the drawing app, however if you then try to convert this to a path he result will probably look like this.
![]()
This happens because the font in the font panel is set to "Roboto" and this font doesn't contain any Chinese characters.
To fix this click the undo button on the top toolbar to restore the original text, then select the text and choose a Chinese font from the font list. (There are two Chinese fonts that are shown in red.) Now repeat the text to path operation.